In this tutorial, you will learn how to set up and use OpenAI Swarm in Python to create a multi-agent system. The tutorial will cover environment setup, and basic usage of the OpenAI Swarm framework.
But what can I do with OpenAI Swarm?
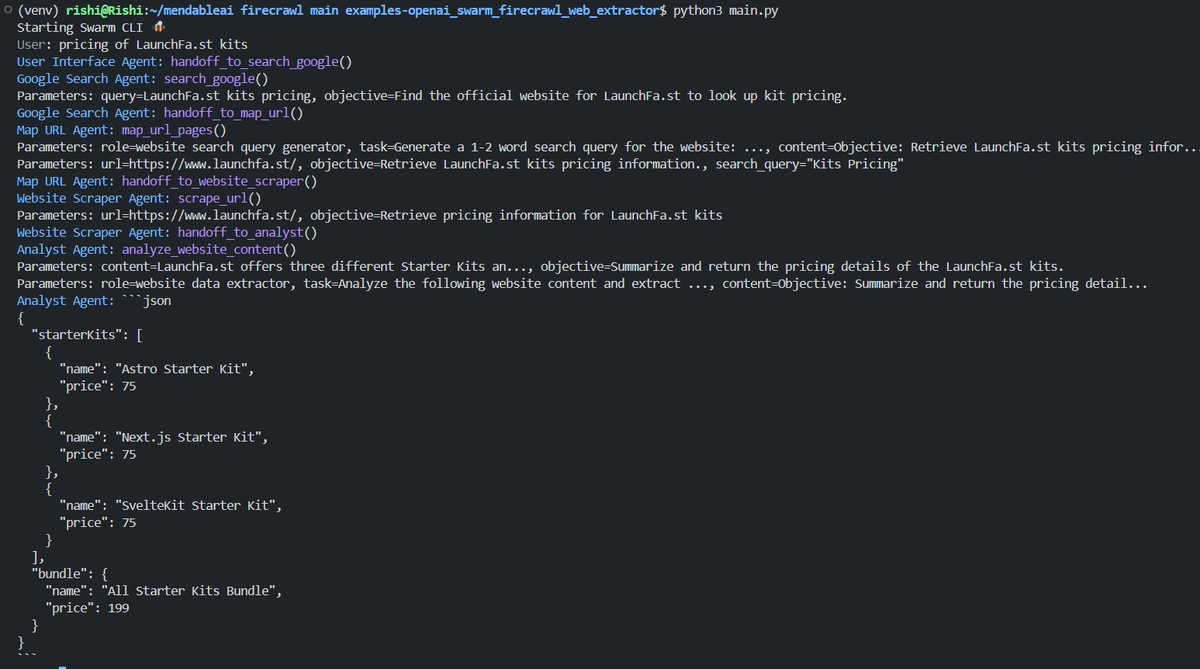
With Firecrawl and OpenAI Swarm, a multi-agent system could crawl the internet and answer the pricing of LaunchFa.st starter kits in JSON format 💥
Prerequisites
You’ll need the following:
- Python 3.10 or higher
- pip package installer
- OpenAI Account
Table Of Contents
- Set up a new virtual environment
- Define dependencies
- Install the dependencies
- Define environment variables
- Create a Python script to use OpenAI Swarm
- Run the Script
Set up a new virtual environment
# Create a new directory for your projectmkdir openai-swarm-tutorial
# Navigate to the project directorycd openai-swarm-tutorial
# Create a new virtual environmentpython -m venv venv
# Activate the virtual environment
## On Windows:venv\Scripts\activate
## On macOS and Linux:source venv/bin/activate
Define dependencies
Create a requirements.txt file in the project directory with the following dependencies:
git+https://github.com/openai/swarm.gitpython-dotenvInstall the dependencies
Install the dependencies using pip:
pip install -r requirements.txtDefine environment variables
Create a .env file in the project directory with the following:
OPENAI_API_KEY="your_api_key_here"Replace your_api_key_here with your actual OpenAI API key.
Create a Python script to use OpenAI Swarm
Create the main script app.py with the following code:
from dotenv import load_dotenvfrom swarm import Agent, Swarm
# Load environment variablesload_dotenv()
# Initialize the Swarm clientclient = Swarm()
def transfer_to_agent_b():    return agent_b
# Define Agent Aagent_a = Agent(    name="Agent A",    instructions="You are a helpful agent.",    functions=[transfer_to_agent_b],)
# Define Agent Bagent_b = Agent(    name="Agent B",    instructions="Only speak in Haikus.",)
# Run the Swarm with Agent Aresponse = client.run(    agent=agent_a,    messages=[{"role": "user", "content": "I want to talk to agent B."}],)
# Print the last message from the responseprint(response.messages[-1]["content"])
This script does the following:
- Imports necessary modules and loads the
OPENAI_API_KEYenvironment variable. - Initializes the OpenAI Swarm client.
- Defines a
transfer_to_agent_bfunction to switch to Agent B. - Creates two agents: Agent A and Agent B with specific instructions.
- Runs the Swarm with Agent A and a user message.
- Prints the last message from the response.
Run the Script
Execute the script:
python app.pyThis will process the initial message with Agent A, potentially transfer to Agent B, and display the result.
Conclusion
You have now learned how to set up and use OpenAI Swarm to create a basic multi-agent system. This example demonstrates agent definition, inter-agent communication, and basic Swarm execution. To expand on this, consider adding more agents, implementing complex transfer logic, or exploring advanced Swarm features like memory or tool use.
If you have any questions or comments, feel free to reach out to me on Twitter.